My apartment room right now is just kinda...blah. Partially because I've been living in the same place for quite a while and it's time for a change, but also because our apartment was just renovated and I've been too paranoid to put anything on the walls since everything was freshly painted. If there were any holes or rips or anything of the sort in the wall, it'd be pretty obvious who did it, considering I'm the only one who has lived in this newly renovated room. But my new apartment will be a different story--it will be nice, don't get me wrong--but it wasn't just barely painted (to my knowledge); plus my landlord is MUCH more easy going, so I figured I can actually decorate the place for once (not that I've ever planned to put a million holes in the wall or anything, but I've felt like I couldn't put anything at all on the walls in the past).
So one of my previous roommates had a really cute idea for decorating the walls, and I decided to duplicate her idea. It's really easy, cute, and inexpensive. Triple win.
Basically it's a wall hanging using fabric and cardboard. I'll tell you what I did, but obviously you can change things to your liking. Here's what the finished product will look like (these are the ones I made):
Here is what you will need:
- Fabrics pieces of your choice large enough to fit over your cardboard (with about 1 1/2 inches longer than each side of your cardboard pieces, so you'll need to decide in advance how big you want your cardboard pieces to be so you know how much fabric to buy) (it's up to you what you pick--you can use the same for all three (or whatever number you choose) or pick different fabrics (I used 10 1/2 inch squares of cardboard, and if you do the same as I did, you'll only need about 1/3 yard of fabric, which will cost around $7 depending on how expensive the fabrics are that you pick) (make sure if you get different fabrics you pick designs that will look good together on the wall); but my biggest tip is to pick fabrics that aren't super thick or it will be hard to get them to stay on the cardboard but also pick fabrics that aren't too thin, or else the cardboard will show through the fabric really obviously--so basically go for the middle road thickness)
- Cardboard from leftover boxes (enough that each piece can be the same size)
- X-acto knife or a razor blade cutter (or even a kitchen knife if you don't have any of the other blades in the house)
- Duct tape or packing tape
- Scissors
- Ruler
- Iron and ironing board
I couldn't find a razor blade, so I decided to just use a knife. It worked well enough. I used my ruler to measure out about 10 1/2 inches on each side.
DO NOT use your scissors to try and cut the cardboard. It is nearly impossible--it makes is so that you risk bending the cardboard by trying to get the scissors to cut in deep enough; plus, you can get a much more exact straight line with a razor blade/knife. (Yep, I used a magic genie cardboard box, compliments of my niece.)
Here's what my three pieces looked like. It's actually easiest to just cut one piece by using the ruler to measure each side, then use the first piece as a template for how large to cut the next two pieces--that way you're more likely that they will be identical (or close to it) in size.
Next I ironed my fabrics. You may not have to do this, but chances are there will be lots of creases in the fabric if you just bought it from the fabric store like I did. I highly suggest taking the time to iron it if there are wrinkles because it's impossible for you pull the fabric tight enough over the cardboard to get rid of the wrinkles, so it won't look as good.
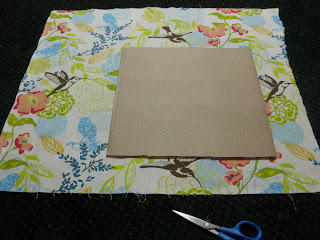
Next I placed my cardboard on the fabric and so I could figure out what size I needed to cut the fabric to.
Here's what it looked like once I cut the fabric (I had about 1 1/2 inches of fabric hanging over on each side).
Next, flip over the fabric so the brown cardboard side and the underside of the fabric are touching. Then I taped the opposite sides of the fabric to the board. Make sure the fabric is lined up right and that you pull the fabric taught so you won't have wrinkles.
Finally, I taped the other two opposite sides to the cardboard. You can leave the end flap on the corners untaped, but I suggest folding the corners like you see above so that you won't see the fabric hanging out from the back when it's hanging up on the wall (you'll may have to readjust the corner a few times so that the corner won't "pooch" and look awkward).
Once you fold down all the corners, it'll look like this. Repeat with your other two pieces of fabric and cardboard.
Ta da! All done! It should only take about an hour (that's about how long it took me, and I'm uber OCD about getting all the corners right, so it probably won't take you that long). Now you can put any kind of hanger you like on the back (Command strips, for example, or even just extra duct tape keeps it up pretty well (but that would probably be best used on a peg board wall or a wall you aren't worried about having tape on).
Hope that helps! Happy crafting!


No comments:
Post a Comment